bdbssb
-
Posts
503 -
Joined
-
Last visited
-
Days Won
104
Content Type
Profiles
Gallery
Downloads
Events
Forums
Articles
Everything posted by bdbssb
-
Correct @Poorboy good find. For those of you who aren’t aware if you make a new map from a previous one it will usually have an existing tip collision mask. You need to paint a new one because the original map will have all the road areas and buildings painted so that material can’t be dumped on those areas. What will happen is when you mow grass or even for example straw windrowed will not appear in those areas but then mound up as soon as you hit a spot that doesn’t have the painted area. You have to remove all tip collision area and re paint then run the script.
-
 Or you can back the modDesc version back a few. Change to to maybe 49 and try.
 -
Talked on discord. Anyone following it was a corrupt file.
-
Yeah I’ve never checked to see if you can open it somehow with notepad but once the map is loaded scroll all the way through the console to double check for errors or warnings. If there is a missing shader it can cause that.
-
Are there any errors or warnings listed in the console in ge?
-
That is new to me. I’ll see if I can find an answer.
-
Have you checked your log for errors or warnings? I haven’t heard of this issue unless a person has a mod conflict.
-
Sorry didn’t see this closed out. Did you find the bit settings? They are in ge in the collision mask.
-
I think we discussed this in discord and you found the issue? It was an object in the i3d if i remember correctly.
-
👍🏼
-
@WrinkleysRule huge thanks for the detailed help.
-
Good point. Are the modifiers being applied while in object mode?
-
Thanks to @WrinkleysRulefor the awesome tutorial. “Priceless”. As far as the modifiers go. It’s been a few days since I’ve been in blender however I’m pretty sure modifiers will disappear from the side panel once applied. Just giving feedback.
-
Version 11.11.20.00
46 downloads
This is just a simple placeable under the decoration category. Place this mod to test your parking skills in a semi. You can do straight backing, an offset, or parallel park. If you knock the cones over you can pick them up and move them. If you want to reset them automatically simply sell the placeable and buy again, or save your game and start the game again. It is a large area so be prepared to have an open space. -
View File FS19 Parking Test Lot This is just a simple placeable under the decoration category. Place this mod to test your parking skills in a semi. You can do straight backing, an offset, or parallel park. If you knock the cones over you can pick them up and move them. If you want to reset them automatically simply sell the placeable and buy again, or save your game and start the game again. It is a large area so be prepared to have an open space. Submitter bdbssb Submitted 11/11/2020 Category FS19 Placeables CREDITS bdbssb
-
I know I helped with beast so I’m bias but this thing is a blast. Stumps are simply pooof. Drop machine in front of the tree, cut, then run the stump over. Quickly trees are chips and stumps are dust. Huge thanks to NC for taking on this challenge.
- 13 comments
-
- 3
-

-
- wood chpper
- stump grinder
- (and 2 more)
-
Thanks for the testing and the feedback. Awesome to hear positive comments. It was as fun to work on as it is to use.
- 13 comments
-
- 2
-
-
- wood chpper
- stump grinder
- (and 2 more)
-
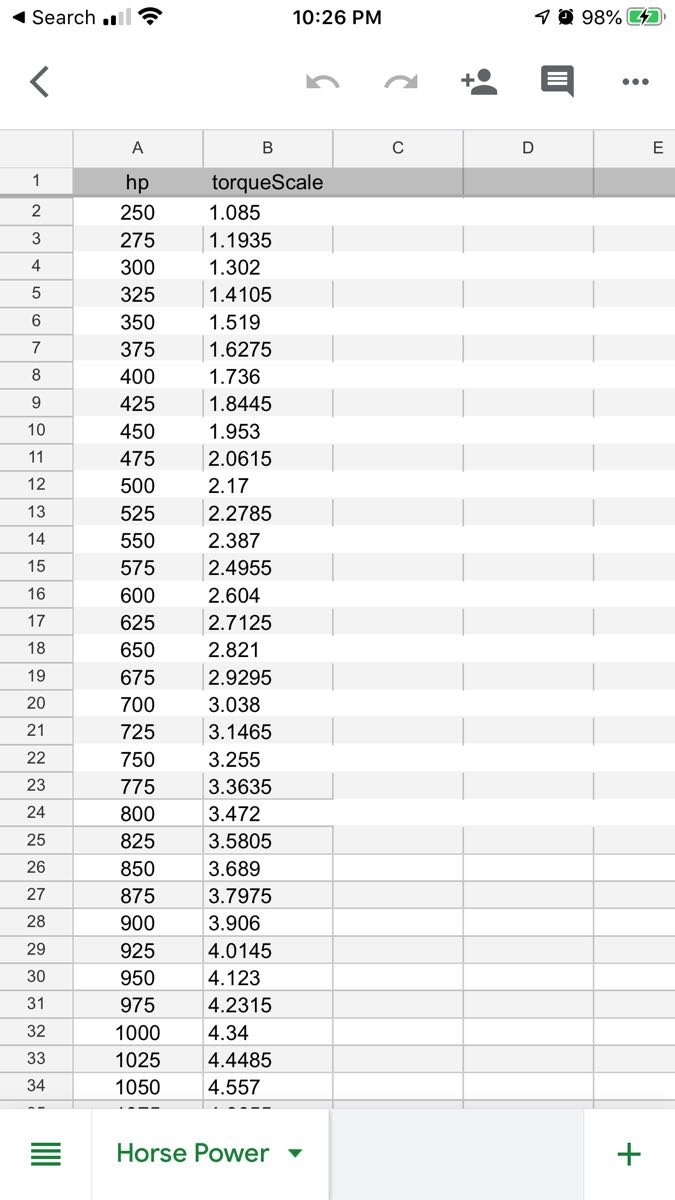
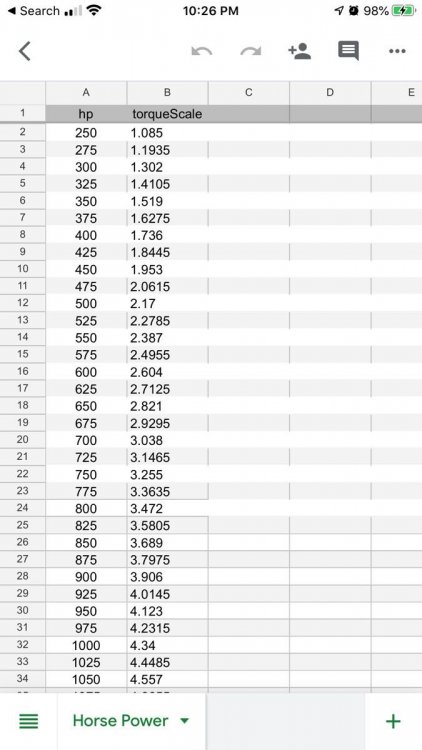
If you’re too lazy to do the torque to HP math 😂
-
I used this application for the neon sign on the placeable BGA on this sight.
-
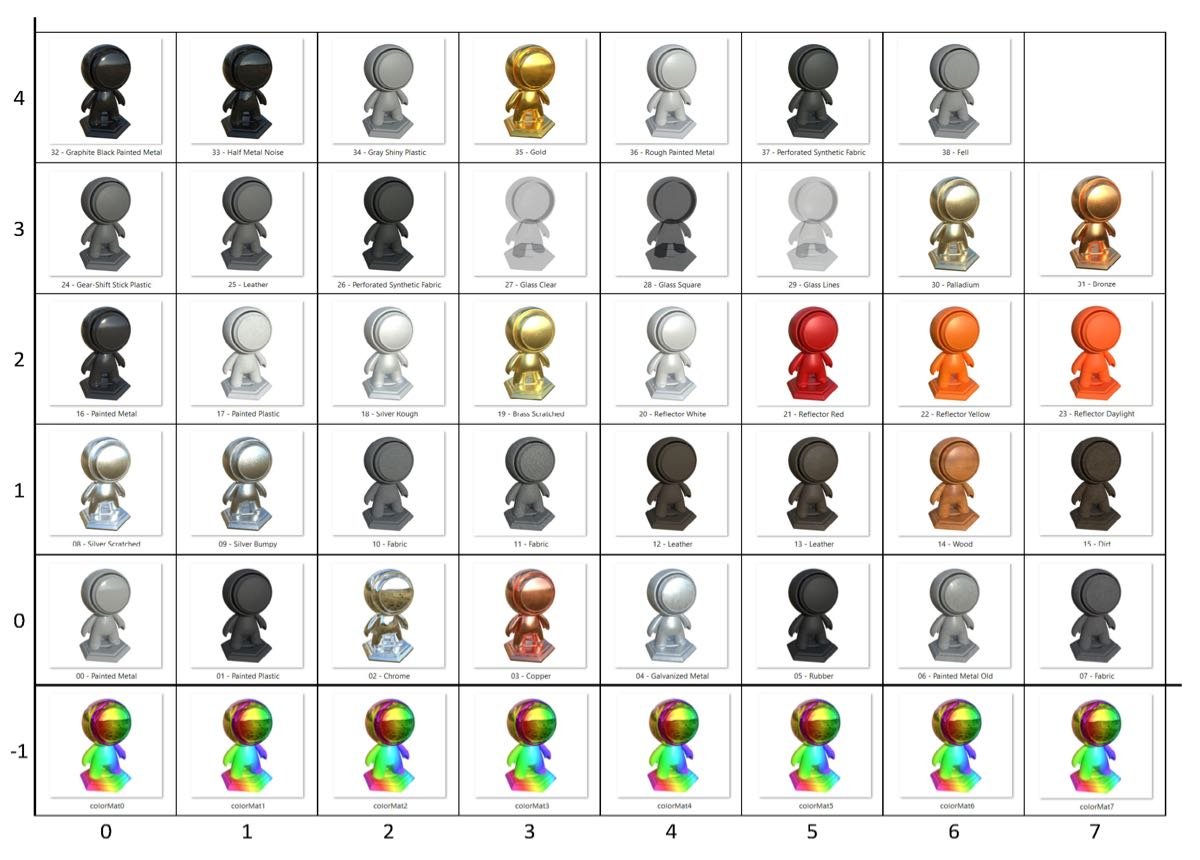
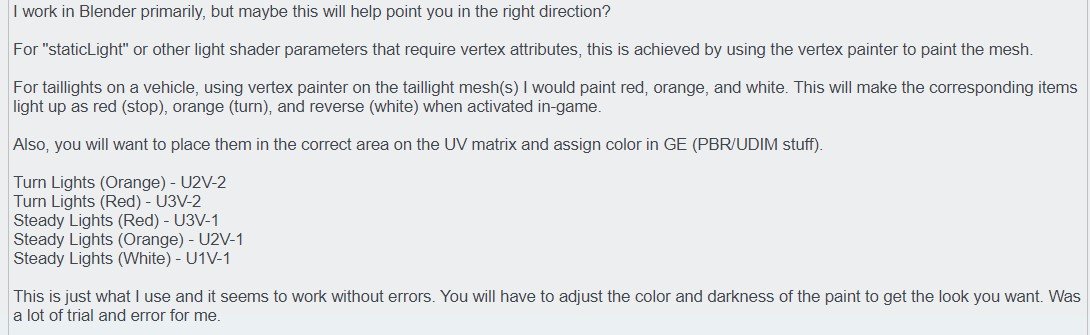
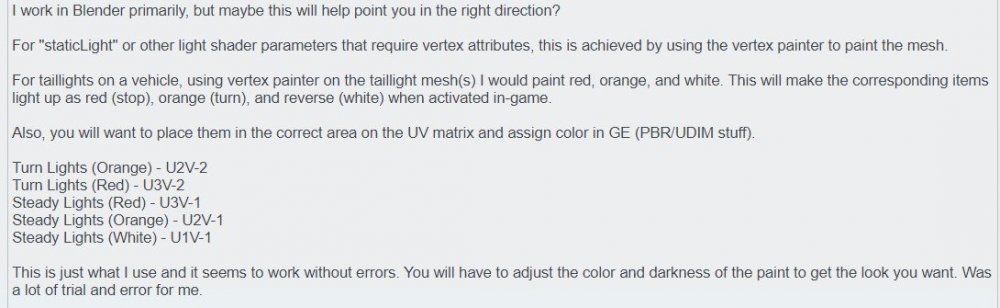
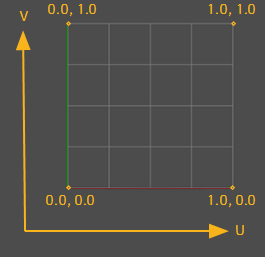
Shywizard shared the image below on where to place your uv to work correctly for static (emissive) lighting. Also be sure to use vertex paint in blender for the color you want to be emitted when the light is activated. If you don’t paint in vertex mode you will get an error when applying the static variable in the vehicle shader. Materials and color can be edited like typical udim settings in the shader as well. Below is an image explaining what the U,V stands for. Basically in blender U = X and V = Y.
-
<hubs> <color0 useBaseColor="true" /> <color1 useBaseColor ="true" /> <color2 useBaseColor ="true" /> <hub linkNode="wheelFrontLeft" filename="$data/shared/wheels/hubs/hub_n18_1.xml" isLeft="true" scale="0.4 0.4 0.4" /> <hub linkNode="wheelFrontRight" filename="$data/shared/wheels/hubs/hub_n18_1.xml" isLeft="false" scale="0.4 0.4 0.4" /> <hub linkNode="wheelBackLeft" filename="wheels/hub_n8_4Custom.xml" isLeft="true" scale="0.285 0.285 0.285" /> <hub linkNode="wheelBackRight" filename="wheels/hub_n8_4Custom.xml" isLeft="false" scale="0.285 0.285 0.285" /> </hubs>
-
<hubs> <color0 useRimColor="true" /> <color1 useRimColor="true" /> <color2 useRimColor="true" /> <hub linkNode="wheelFrontLeft" filename="$data/shared/wheels/hubs/hub_n18_1.xml" isLeft="true" scale="0.4 0.4 0.4" /> <hub linkNode="wheelFrontRight" filename="$data/shared/wheels/hubs/hub_n18_1.xml" isLeft="false" scale="0.4 0.4 0.4" /> <hub linkNode="wheelBackLeft" filename="wheels/hub_n8_4Custom.xml" isLeft="true" scale="0.285 0.285 0.285" /> <hub linkNode="wheelBackRight" filename="wheels/hub_n8_4Custom.xml" isLeft="false" scale="0.285 0.285 0.285" /> </hubs>