All Activity
- Today
-
 DDM_Modding joined the community
 - Yesterday
-
 Lulex2844 joined the community
 -
 JD_Dredla joined the community
 -
 Robertfrulp joined the community
 -
 Shinergywhf joined the community
 -
 pajac joined the community
 - Last week
-
 naimog joined the community
 -
 Lulex6482 joined the community
 - Earlier
-
Kartoffel und Rüben Lager fehlt noch Werde mir das umbauen auf die einzelnen 2 Fruchtsorten https://www.farming-simulator.com/mod.php?mod_id=310377&title=fs2025
-
PM them to me as a zip file and I will try to work out what is happening
-
Yes I did happy to send over the xmls and i3d files for you to look at, Many thanks
-
How have you entered it in the maps placeables.xml ?
-
Hi, I am using a fence in the giants editor however it’s is not sellable or will not overwrite when bought with farmland, if I place it in game it is sellable but is owned by farmland 0, I have made a custom xml and followed a few guides if anyone could help me figure this out I would be grateful thanks
-
Nein Ich gehe wen das so weiter geht mit FS25 wieder zurück nach FS22 Werde mit dem FS25 nicht warm Funke springt nicht rüber
-
Do I understand correctly that you are using FS25 scripts and GE 10.4/5 to create a map for FS22 ???
-
Da wird ja Nichts in der Log-Datei angezeigt Geht nur ein Fenster auf mit Fehlerbericht senden Und GE 10.5 ist das gleiche Problem nach dem Speichern und erneut ins Spiel geht Stürtzt das Spiel ab Und da gibt es noch mehr Probleme mit dem GE 10.5 Werde mir FS25 noch diesen Monat anschauen Dann gehts wieder in den FS22 Habe ja noch alte Fertige Map da funktioniert das mit den Script ohne abstürtze Wurde ja noch mit GE10.3 gebaut Aber gibt ja möglichkeit das zu umgehen
-
You do realise that GE 10.4 doesn't work correctly with the latest version of the game (1.9.0.1) due to changes in the terrain shader and other items. Regarding loading crashes, what if anything is shown in the games log.txt
-
Funktioniert soweit gut mit importieren Wen man Map abspeichert und dann ins Spiel geht Alles ok Wen man dann zb. Spiel Speichert und aus den Spiel geht und dann wieder rein geht ins Spil was man gespeichert hat Stürtzt das Spiel bei ca 50% ab Mache das jetzt immer so Platzierbare Objekte importieren im Giants Editor Richtig hinstellen und was dazu gehört Dann wen Fertig die ganze TG löschen speichern und is Spiel gehen Dann kann man Speichern und später wieder das savegame Starten ohne Probleme Beide GE probiert 10.4 und 10.5 Und benutze nur den 10.4 GE Weil beim 10.5 GE wen der auf ist und Ich zb. die Fenster Rechts oder Links breiter ziehen möchte hängt der 10.5 GE sich auf Das passiert beim 10.4 GE nicht
-
i have not came across that issue yet. just the slope and the start pole rotating. if i find anything else ill report back. but stuck on poles till you get the new script out. back to placeing buildings for now lol
-
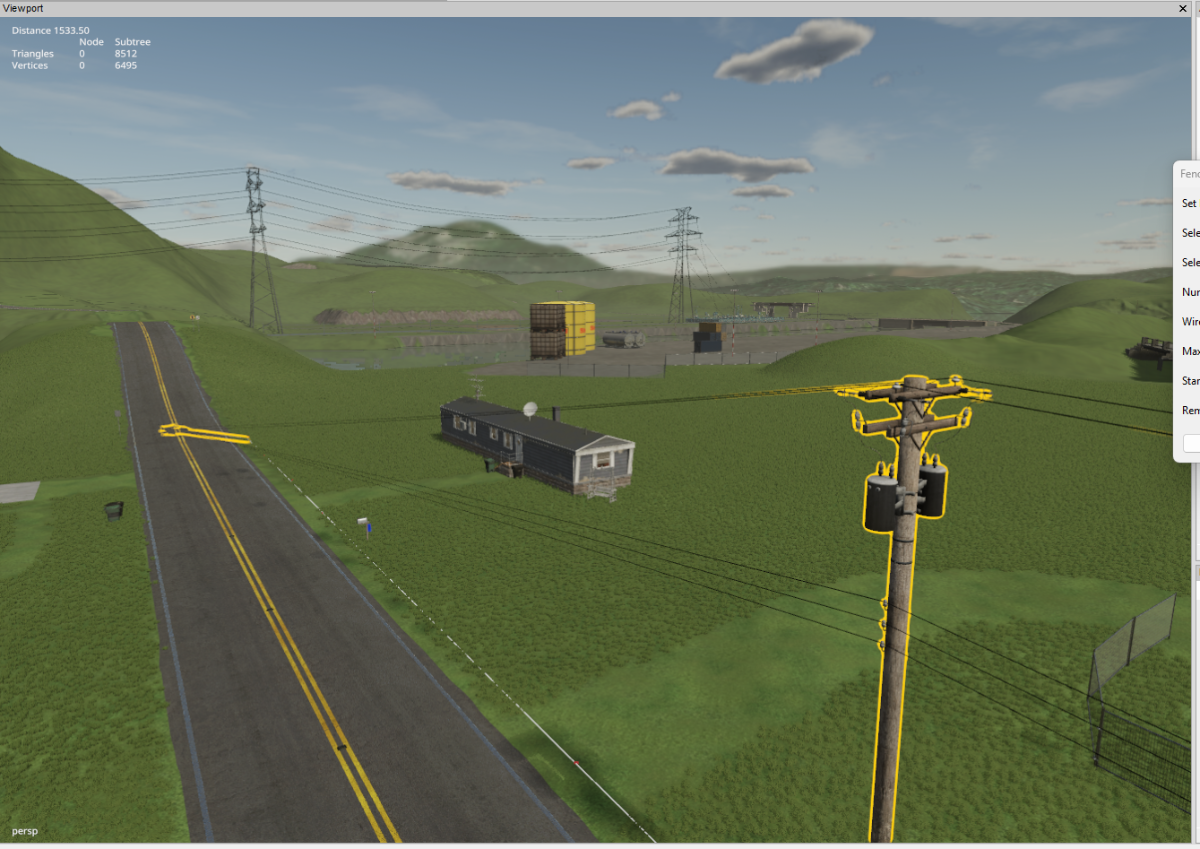
Apologise I have added the wrong version to the zip file will upload a new zip file tomorrow (09/08/25) as I have updated some of the other FS25 Scripts. Whilst testing the script I have come across a slight problem where the poles may not rotate enough (usually caused by a tight curve in a cubic spline ,sharp angle if using a linear spline) so causing the wires to crossover The soloution ( with thanks to @antler22) is to 1. Run the script with no. wires set to 0 2. Rotatet posts/poles so a better angle is created between the preceding and following posts 3. Rename last post/pole unique so you know where pole placement starts over (for examlpe pole1_A) 4. Run script again with wires set at desired level, this will put wires against all previous posts as well as new ones Delete second set of posts after marked end, as these are now redundant Works for fences as well Edit 15/06/25 This problem along with the upright problem has been solved in the latest version of this script 15/06/25 and is available at the beginning of this topic
-
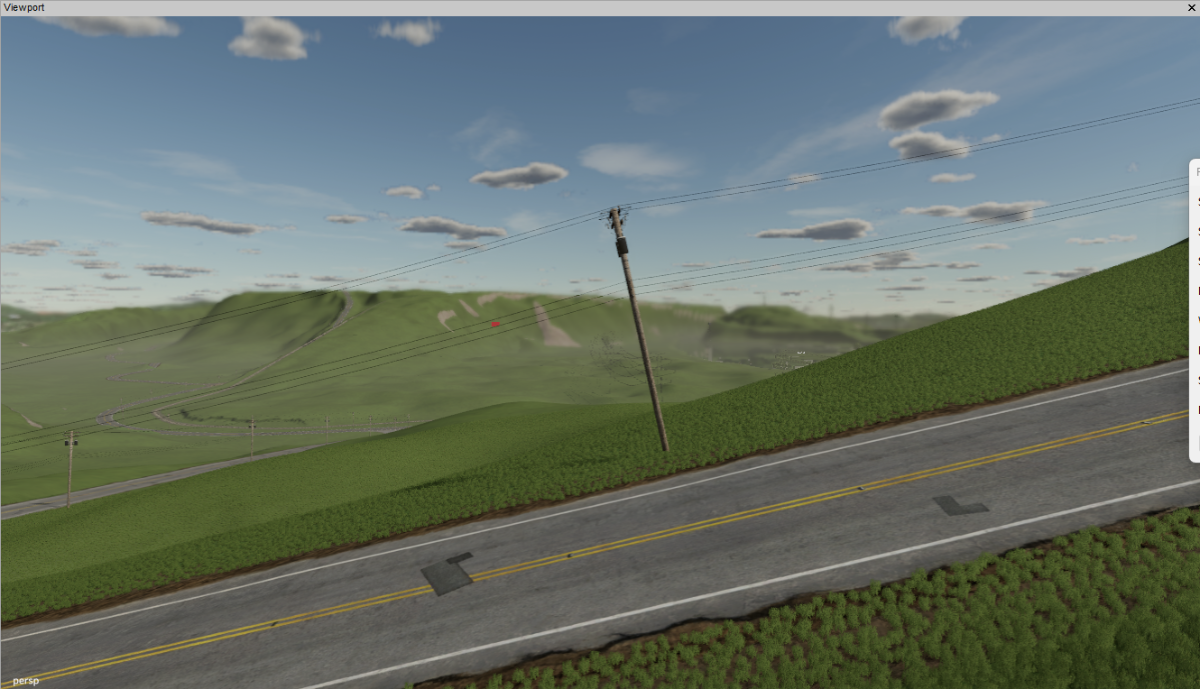
quick note, sometimes its either the first one or the last one, but it knockes it down/rotates it
-
i found it lol and it works now! thankyou and good job
-
thank you for the quck response and fix! Glad you know what your doing and taking care of the mappers out here! cheers buddy, quick note, i might be dumb but did you post the script in the last comment lol? cant see it,
-
Added updated FS25 Script Versions Zip This contains an updated Fence Power PLacement script (fixed some bugs) and a new Spline CSV Creator Panel OBJ_25 Spline CSV Creator Panel OBJ_25 ChangeLog Script operation is the same output has changed slightly A new CSVSpline transform group is automatically created in the Scenegraph and the new CSV spline is created in this TG. The new CSV spline ,spline.obj and csvData.txt are still added to the CSVData folder in the maps folder (same place as the map.i3d )which now has
-
There appears to be a bug in the code which I will investigate and correct. In the meantime I suggest opening the script in the Script Editor (Window -Script Editor) navigate to the Fence_Power_Placement_25 script and change the following line from line 252 setRotation(myId, rx, ry, rz); to line 252 setRotation(myId, 0, ry, 0);
-
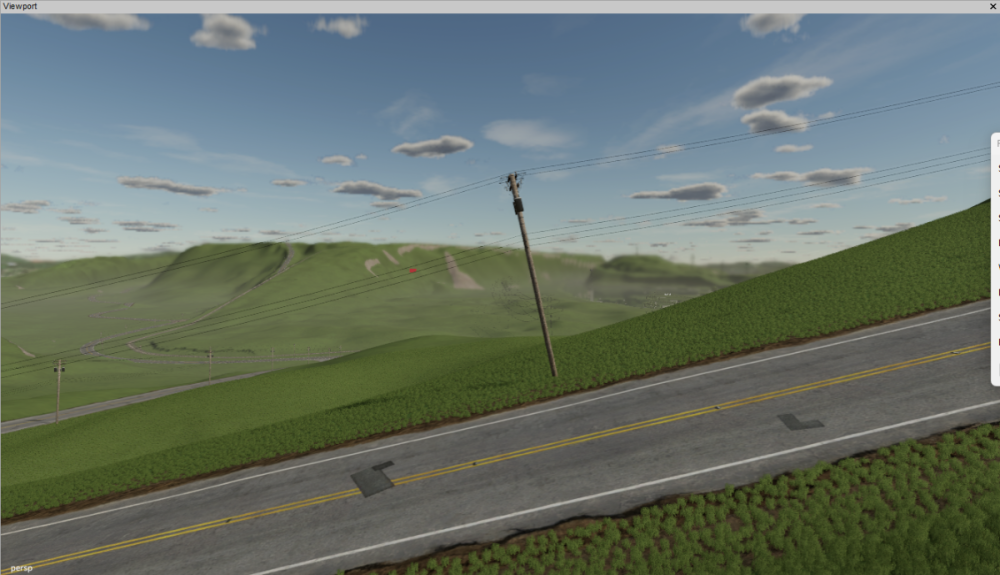
having an issue with poles not staying upright on a steep road way, they slant with the hill, any idea?
-
Bdbssb FS25 Modhub Mods
-
Dogface FS25 Modhub mods
-

Create Fields with/without Islands using Splines
Revelation215 replied to WrinkleysRule's topic in Mapping
Tutorial videos would make these so much easier to understand. -
Must aber beim Script noch Einstellungen machen
-
this is gunna be fantastic and will help me so much. just started in the map making. Thank you
-
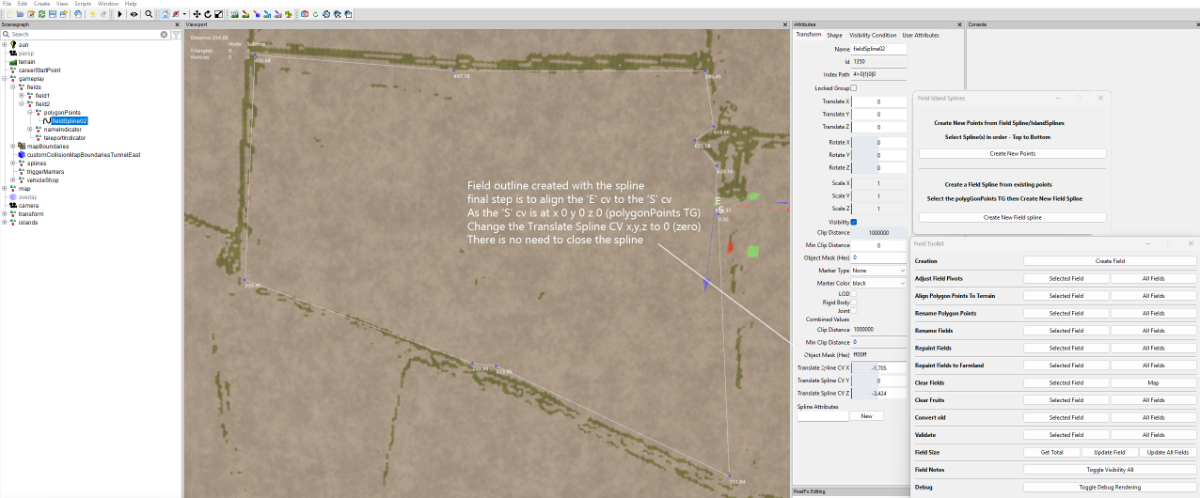
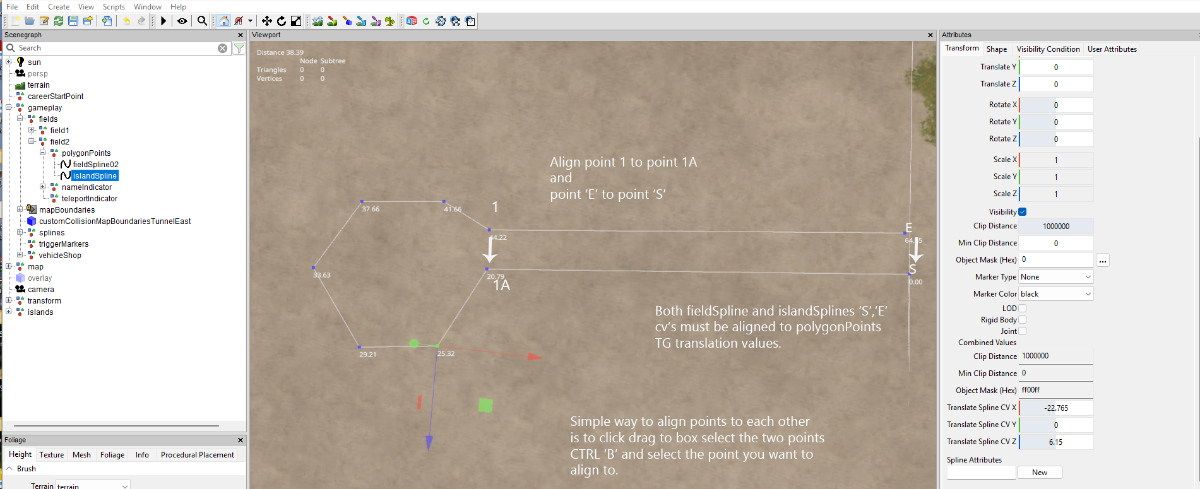
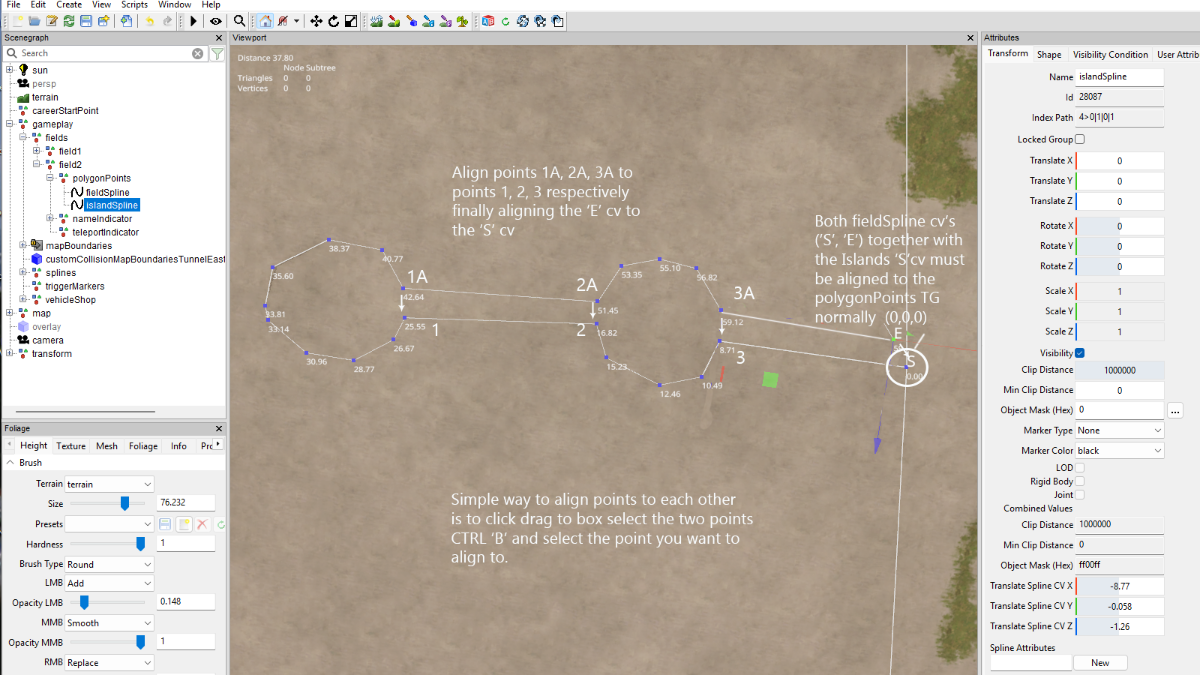
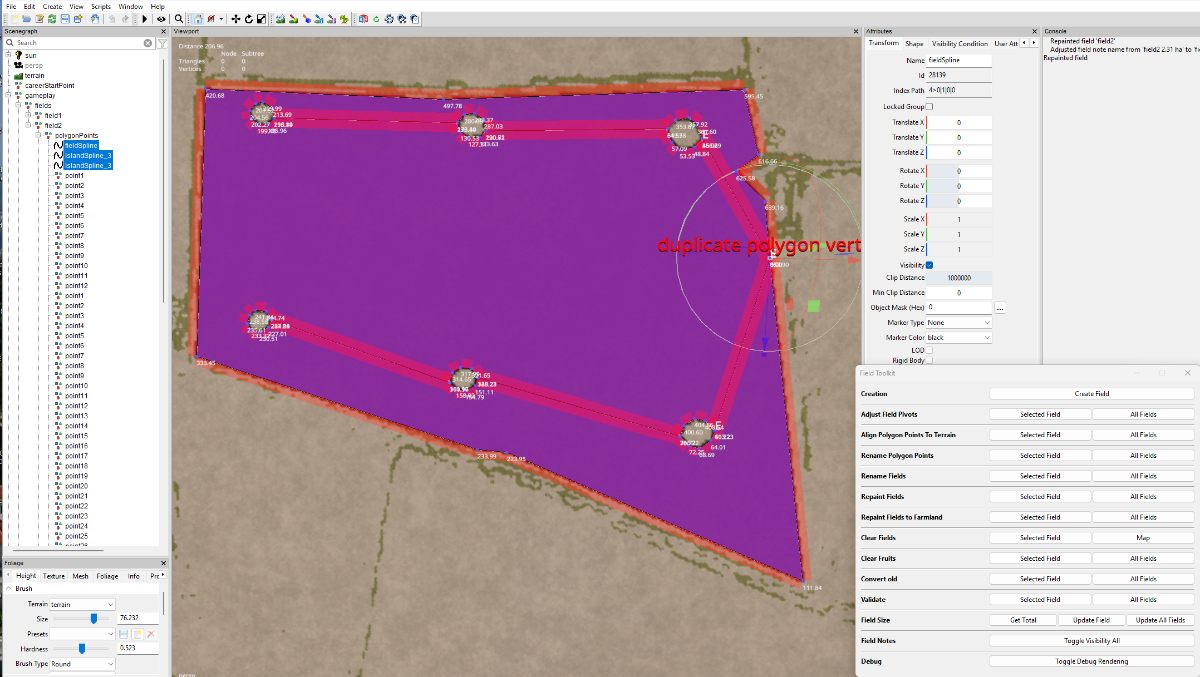
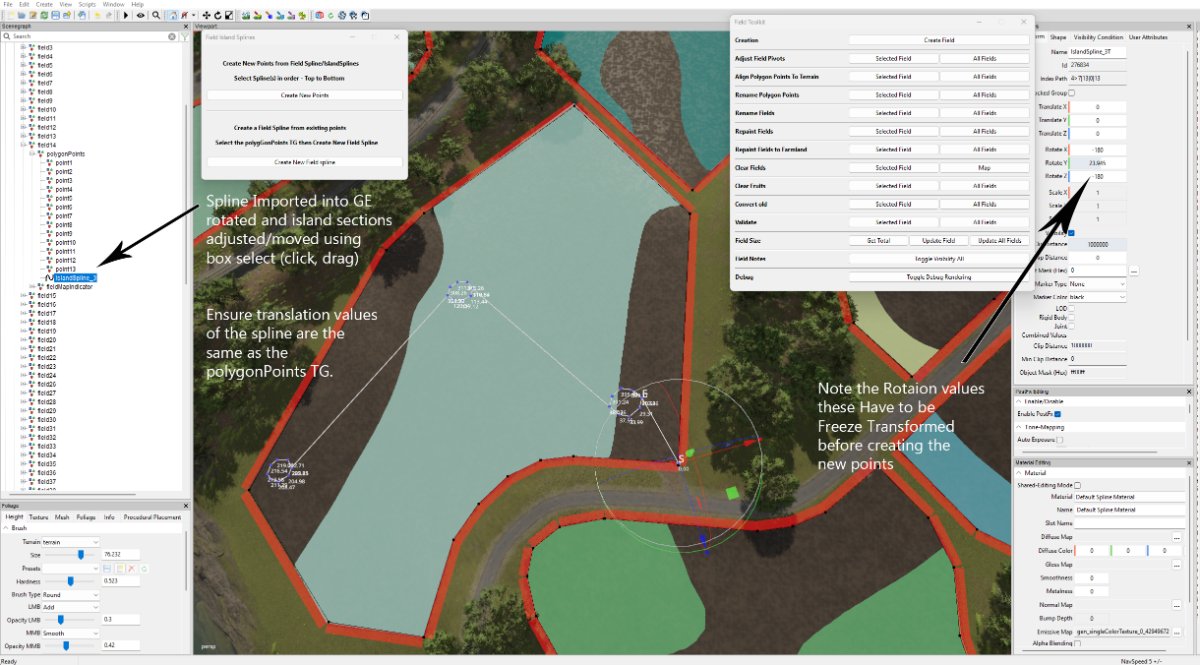
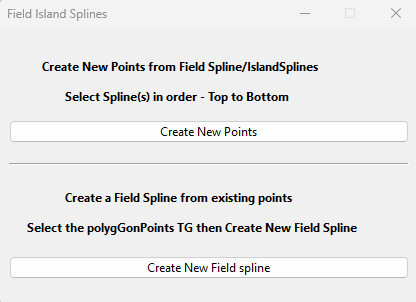
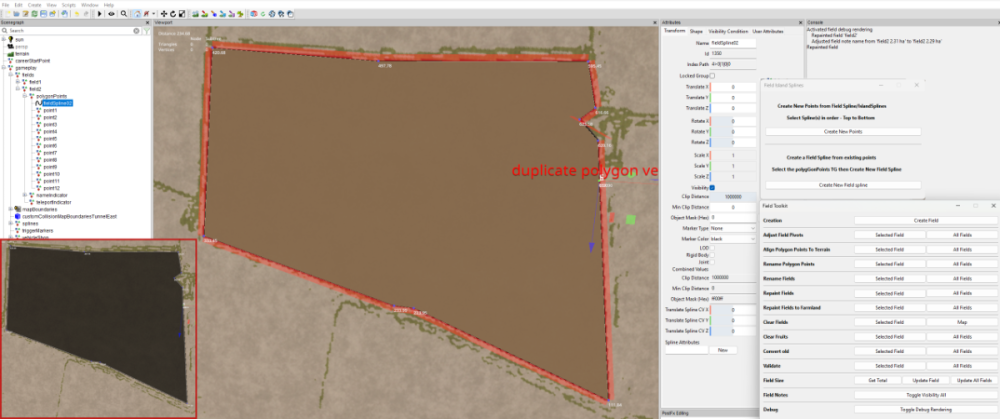
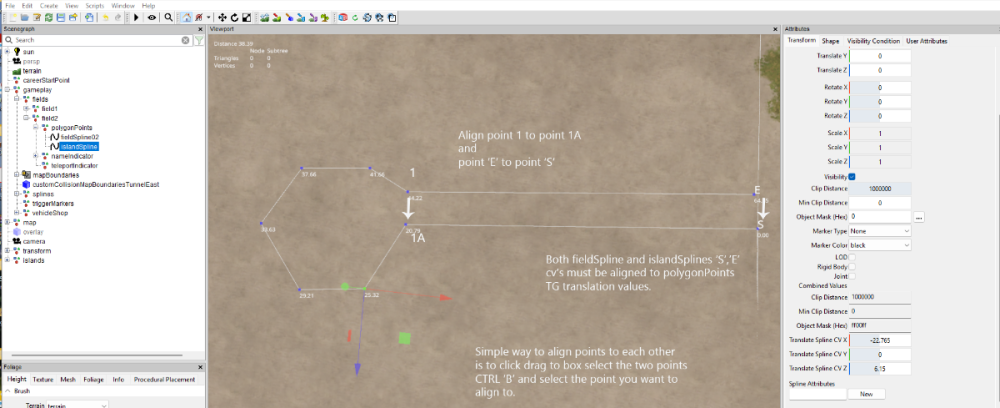
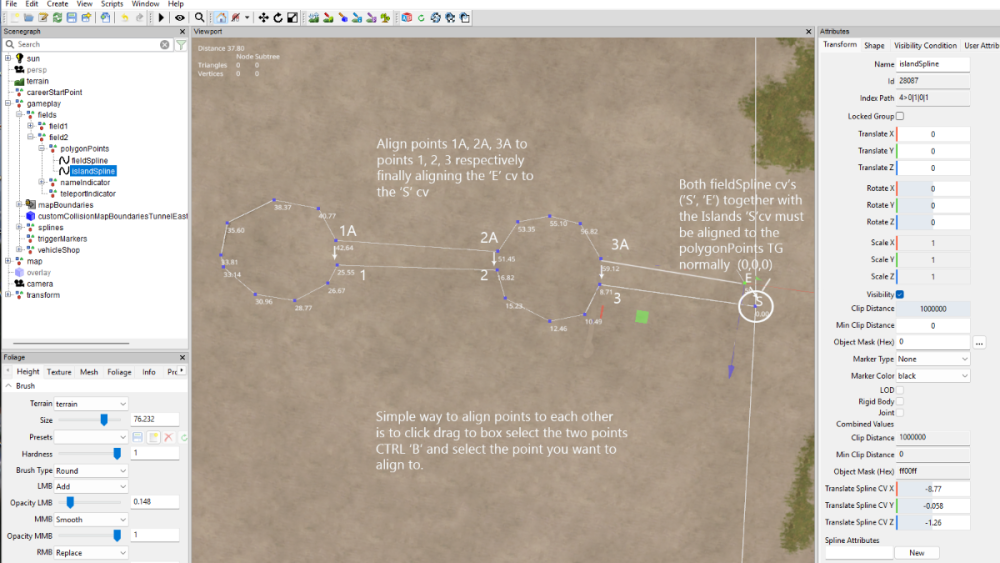
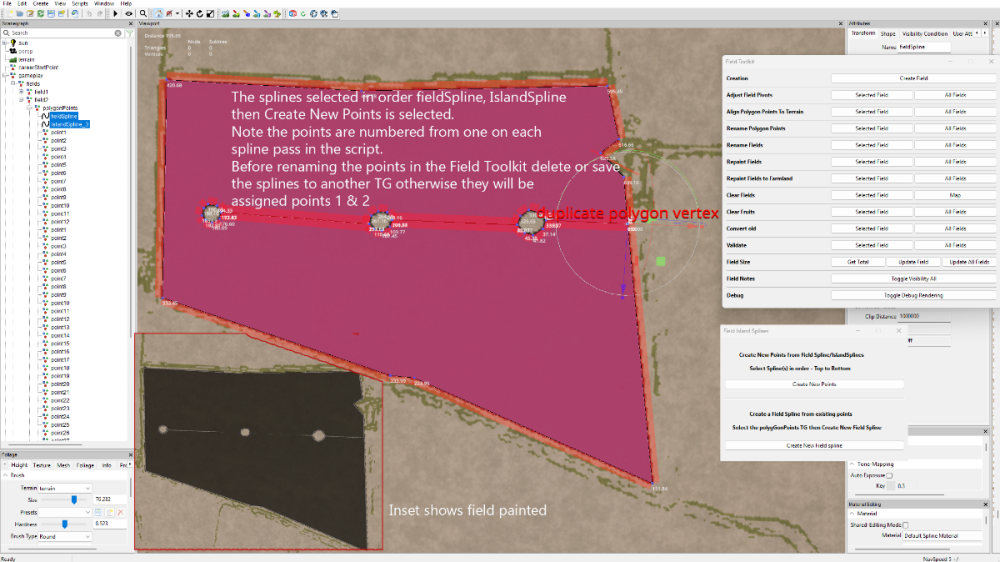
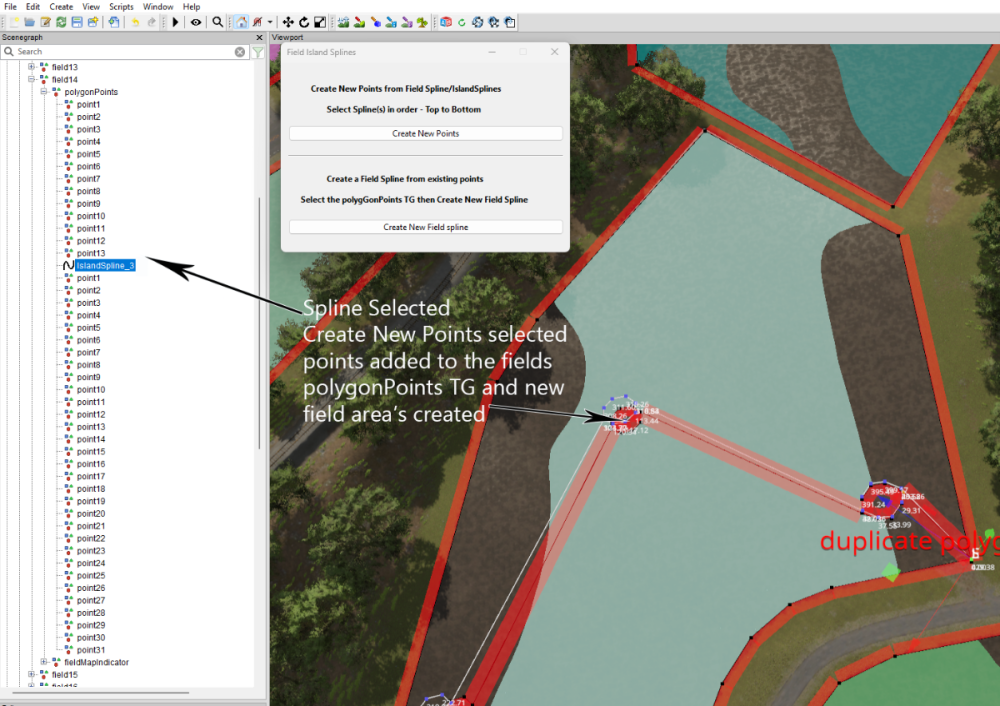
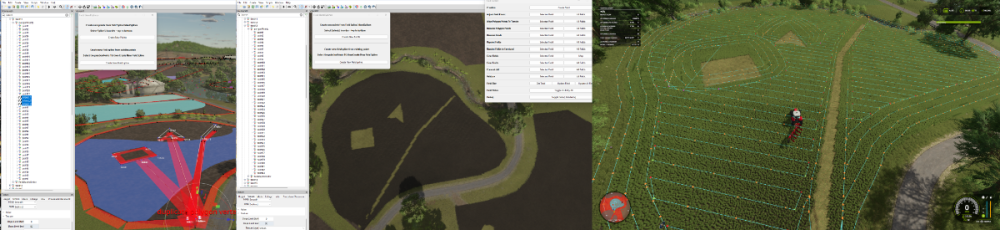
This tutorial will show how to create fields with/without islands using the Field-Island Splines script in conjunction with the GE Field Toolkit (Scripts –Shared Scripts– Map – Farmland Fields – Field Toolkit). Download the Field-Island Splines zip file (found at the bottom of this tutorial) and unzip, place the script in the following folder Download the Field-Island Splines zip file (found at the bottom of this tutorial) and unzip, place the script in the following folder C:/Users/******/AppData/Local/GIANTS Editor 64bit 10.0.4/scripts (replacing ****** with your computer name) Field-Island Splines script This script is in two sections the top panel section ‘Create new points from FieldSpline/IslandSplines’ is used for creating fields with or without islands it basically works by using a spline to create the field edge then using a second spline to create island shapes and when the Create New Points is selected it creates a new list of polygonPoints in the polygonPoints Transform Group. If creating a field with islands then the field and island splines must be selected in order, top to bottom, if only creating a field then just select the field and Create New Points, field creation can then be carried on using the GE Field Toolkit. The bottom panel section ‘Create new Field Spline from existing points’ is used when modifying existing fields, because of the different ways some fields are created (when adding Islands points placement accuracy is important) it may be necessary to create a new fieldSpline from the original polygonPoints . When Create New Field Spline is selected a new fieldSpline ( with the name of the current field ) will be created using the existing points and placed in the polygonPoints Transform group the original points can then be deleted. Because some base game mod maps fields do not close the spline correctly when the script is executed (Create New Field Spline) the script will automatically add a new final point at the same location as the ‘S’ cv, so effectively closing the spline. Islands can be created in any shape and once created saved in a separate folder so creating a ready made album of different shaped islands that can be used in any field. The following sections show how the script can used. Creating a Field with Islands from scratch When inserting points one quick method is to select CTRL ‘B’ and select the cv with the left mouse button, keeping the left mouse button pressed move to the next placement point and press Insert repeat until shape completed Open GE and select Scripts –Shared Scripts – Map – Farmland Fields – Field Toolkit to activate the Field Toolkit panel In the Scenegraph select the fields Transform Group (TG) (gameplay –fields), in the Field Toolkit pop up select Create Field a new field will be created in the fields TG (numbered in the next available value) in this case field2 (this is the field that will be created first in this tutorial), also in this TG is the polygonPoints,nameIndicator and teleportindicater transform groups. Selecting the fields2 TG , CTRL ‘B’ , left mouse click to place the fields2 TG at the entrance of your field ,the Field Notes panel will obscure the actual placement so in the Field Toolkit under Field Notes select Toggle Visibility All to turn it off. When placing fields it is best to place the field TG at the entrance to the field and move the fieldMapIndicator to the centre of the field if required and leave the teleportindicator at the field entrance Select the polygonPoints TG and delete all the points. In GE Select Create –Spline and cut/paste into the polygonPoints TG (do not middle mouse drag as it will assign new translations to the spline) name this spline fieldSpline02 (to avoid confusion when more than one spline is used) in the Attributes Panel -Shape Tab change the Spline Type to Linear this spline type is the same format used by the Field Toolkit when creating fields. Ensure you have the Translate Spline CV panels in the Attributes Transform Panel if not then Select – View – Show – Physics Selection – Enable All , the Translate Spline CV panels is required as some of the cv’s require accurate placement for the fields/islands to work correctly Select the ‘S’ cv and delete it -- This will align the start of the spline to the polygonPoints TG (0,0,0) Select the ‘E’ cv and working clockwise place the spline around the edge of the field (using the method described earlier) place the final point as close to the ‘S’ cv then in the Translate Spline CV panels set the X, Y, Z coordinates to 0 (zero) this will place the ‘E’ cv exactly on the ‘S’ cv (there is no need to close the spline), accurate placement is required otherwise problems will occur with the field generation. Field Spline If just creating a field then Select the spline – Select Scripts –User Scripts -Field-Island Splines and Select -Create New Points a new list of points will be created in the fields transform, delete or save the spline to another TG and carry on with the field creation using the Field Toolkit in the normal way. Image below shows the spline selected, script executed , Toggle Debug Rendering activated, Align polygonPoints to terrain (this also calculates the new field size) and the insets shows the field Repainted and the various log entries. Single / Multiple Islands Create a second spline cut/paste into the polygonPoints TG (immediately below the fieldSpline ) and rename it to islandSpline, (again in the Attributes Panel -Shape Tab change the Spline Type to Linear ) then delete the ‘S’cv as detailed above. With the ‘E’ cv selected draw out your shape (using the method described earlier) the images below show the creation of both single and multiple islands. Single Island Multiple Islands The following image shows a fieldSpline and a three island spline (islandSpline_3) being used to create a field with three islands (suitable for power/pylons installation) In the following image I have duplicated the islandSpline_3 and moved the islands individually to different parts of the field by box selecting (click drag) one of the islands and moving it by the translation gizmo ( if box select is used Ctrl ‘B’ will place all points at the same location) to a different position, then with the spline selected freeze transform any rotation value that has occurred during the island moving, repeating the method for the other islands before selecting Create New Points. The splines have to be moved (to another TG or deleted) before Aligning or Renaming the polygonPoints otherwise they will become point 1,2,3 respectively Then In the Field Toolkit panel Align Polygon Points to Terrain - Select – Selected Field Rename Polygon Points - Select – Selected Field Repaint Fields - Select – Selected Field Validate - Select – Selected Field Note: If you have a duplicate points warning in the console log then delete the duplicates and Rename Polygon points. Modifying Existing Fields For this part I will be using a US map created by the New Mod from Game option but the method should work with other maps, I will also be using the island_3 spline from the previous section. With the field TG (in this case field14) selected, in the Field Toolkit Panel- Select Clear Fields (Selected Field), Clear Fruits (Selected Field), this should clear any terrain detail paint and any crops associated with this field. With the island_3 spline imported into the map cut/pasted it into the polygonPoints TG and then adjusted by the box selecting (click drag) method to suit the proposed new layout Important, when adjusting the island sections ensure that they do not overlap or intersect with any other part of the spline otherwise problems will occur when the new field/island boundaries are created. The image below shows the initial creation of the new island’s layout, the spline was rotated to suit the new layout , this rotation must be Freeze Transformed –(Edit – Freeze Transformations –Rotate) ensure that only the Rotation box is ticked if the Translate box is ticked deselect it. Next with the spline selected, in the Field Island Splines panel select the Create New Points button this will create the new points from the spline and place them in the polygonPoints TG below the spline (Fig. 2) Fig.2 The final steps are as follows, Cut/Paste the spline into another place (TG) in the Scenegraph (otherwise it wil be renamed as a point and cause problems ingame) In the Field Toolkit panel Align Polygon Points to Terrain - Select – Selected Field Rename Polygon Points - Select – Selected Field Repaint Fields - Select – Selected Field Validate - Select – Selected Field Note: If you have a duplicate points warning in the console log then delete all of the named points and Rename Polygon points. Save the map and open in Game, below is an image of the farmlands panel and the islands with a Courseplay course confirming the new island layout. Field Island Splines.zip


- 1 reply
-
- 1
-

-
 <File fileId="39" filename="$dataS/menu/hud/fillTypes/hud_fill_fertilizer.dds"/> <File fileId="43" filename="$dataS/menu/hud/fillTypes/hud_fill_herbicide.dds"/> <File fileId="41" filename="$dataS/menu/hud/fillTypes/hud_fill_lime.dds"/> <File fileId="42" filename="$dataS/menu/hud/fillTypes/hud_fill_roadSalt.dds"/> <File fileId="40" filename="$dataS/menu/hud/fillTypes/hud_fill_seeds.dds"/>