


WrinkleysRule
-
Posts
419 -
Joined
-
Last visited
-
Days Won
94
Content Type
Profiles
Gallery
Downloads
Events
Forums
Articles
Posts posted by WrinkleysRule
-
-
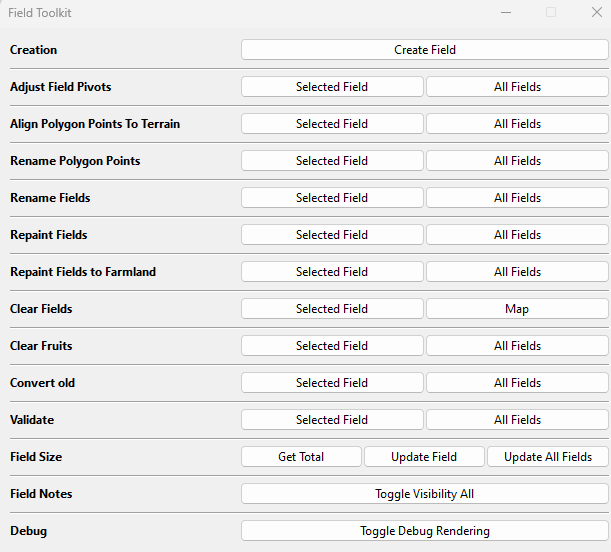
I had a quick look at the field setup but haven't created anything with it (trying to correct scripts at the moment) however if you look at the fields transform in the scenegraph it no longer has corners just the Polygon points.
Have you tried the repaint Fields option then checked the farmlands Info layer (Terrain editing - Info tab) to see if it has automatically painted over the existing area or select Toggle debug rendering which will bring up all the individual fields and Polygon points.
-
Update New version of Editor 10.0.0.1 available
https://gdn.giants-software.com/downloads.php --Log in required
GIANTS Editor Changelog
=======================10.0.1 (12.11.2024)
------------------
- Improved editor preferences migration from older editor versions (game installation path and include paths are correctly reset)When Scripts - Farmlands Toolkit selected it now brings up a new pop up menu to create Fields
more experimention to come
-
For updates see my previous post also as this is a completely new editor it will take some time and experimentation(Giants are renowned for not providing documentation) to get things worked out so patience is required regarding new scripts and tutorials.
The farmlands are created differently in FS25 they appera to have their own Farmlands Toolkit unfortunately this when selected in GE throws the following error
Error: C:/Program Files/GIANTS Software/GIANTS_Editor_10.0.0/scripts/map/farmlandFields/fieldToolkit.lua:10: attempt to call a nil value
which means the script cannot find the installed game even though the editor game install path is correct.
However if you look in the data folder in the masks folder you will see a PG_acres.png which looks like the fields areas, there are several other masks in that folder whose creation is yet to be worked out.
Regarding the unprocessed dem this only appears in the US map data folder so may be just a test that was not deleted before the game was released.
-
The new GE editor and associated testing tools is now available here
https://gdn.giants-software.com/downloads.php --Log in required
Note: I will be updating the existing scripts/tutorials in due course.
If you use any of the existing scripts you do so at your own risk.
EDIT 1300 Z: This could take a time as the inbuilt GE 10 scripts don't appear to work eg not recognising terrain node and game installation path
-
The answer to your rotation problem is in the post above your first post about the problem
QuoteSplines
The spline can now be given any name as long as it includes the name ' spline ' in any part of it i.e. road1_Spline or roadspline01 etc.
Problems will occur if the spline transform or the spline itself does not have the correct rotation, whether in the transform group of the spline or the spline itself . The rotation has to be set at 0,0,0 for any of the scripts to work correctly.
There are a couple of ways of ensuring this, one is to set up your spline in the position you want and freeze transform only the rotation, the other is to select the S cv of the spline and delete it, this brings S to the centre (rotating point) of the spline, then just use the E cv to create the rest of the spline so lessening the chance of inadvertently rotating the start of the spline.
-
I have never tried it in earlier versions so don't know, you could try adjusting the file paths/editor version highlighted in the Installation and Use iInstructions below and see
Installation and Use
To use the script unzip the Import Placeables.zip (available at the end of this tutorial) and copy/paste the folder to the location of your
GIANTS Editor 64bit 9.0.6/scripts folder in this case it is,
C:/Users/*****/AppData/Local/GIANTS Editor 64bit 9.0.6/scripts (replacing the *** with your computer name)
Open GE and open the Script Editor , Window -- Script Editor and select Import Placables
Check and amend the following lines as necessary : -
Line 50 local gInst = "C:/Program Files (x86)/Farming Simulator 2022/" --change to your Farming Simulator 2022 Installation Path if different.
Line 52 local pathModDir = "C:/Users/ccrjs/Documents/My Games/FarmingSimulator2022/mods/" --change to your mod directory path if different.
Line 54 local placePath ={"placeables.xml","xml/placeables.xml","xmls/placeables.xml","maps/mapUS/placeables.xml"}
The 'placePath' array contains the various paths that the placeables xml can normally be found, if your placeables are in a different place/folder then add the path to the list.
When done save the script, the Script Editor can now be closed.
In GE create a new transform group and name it 'placeholders' with the new placeholders transform group selected, in the User Attributes Panel of GE add a new attribute Type 'script callback' with the name 'onCreate' select Add and in the new onCreate box type 'Placeholders.onCreate' (correct Font and spelling required).
This will allow the placables to be seen in GE, the new placeholders TG will be ignored when the map is opened in game and the placeables will be loaded as normal from the placeables.xml.
-
England/ part of Northern Ireland dems (lidar 1 or 2m resoloution ) available here
https://environment.data.gov.uk/survey
Zoom in and draw the polygon around your area by just clicking on the four corners and then select Get available tiles, select product LIDAR Composite DTM select latest year (if choice available) Select resoloution required (1m will give the best resoloution but is a larger file per tile).
Once all tiles downloaded copy/paste the .tif image into a new folder and follow the QGIS post on page 4 of this topic.
map dem size in FS25 is 2048 x 2048 16bit Greyscale.
Looking at the FS25 US map data folder there appears to be two 'dems' one labeled unprocessedHeightMap.png the other dem.png the only difference I can see is the unprocessed has 89 unique colours whereas the dem.png has 81 so there may be a converter or something aavailable in the new GE.
A new DEM Tutorial will probably be created for FS25.
Scotland has patchy LIdar data available here
https://remotesensingdata.gov.scot/data#/map
Wales LIdar data
https://datamap.gov.wales/maps/lidar-viewer/
-
 1
1
-
-
What area of the world are you looking for ???
Also in which version of FS are you intending to create your map ?/
-
Here is an article in the UK Farmers Weekly on maize it gives the row distance and seed drilling distance that maize is normally planted.
https://www.fwi.co.uk/livestock/step-step-guide-planting-maize
-
I take it that you are not familiar with Blender in which case I suggest you look at a few youtube tutorials
Here is one that just deals with adding materials
https://www.youtube.com/watch?v=MIVTzZKlmjE
For a better understanding then I suggest looking at the Blender tutorials at these two sites
https://www.youtube.com/@grabbitt/videos
https://www.youtube.com/user/AndrewPPrice
-
Move what, the distance mesh or the map.dem itself
-
As the distance mesh plays no part of the map.dem terrain and is just a straightforward mesh object (basically decoration) then the figures can be left as is.
Bear in mind that GE does not allow any negative heights (such as -2.1 etc ) also if the map dems lowest height is less than say 10 you will not be able to effectively create rivers/ponds etc
-
Just tried downloaded without any problem, ensure that you are logged into the site before attempting to get any downloads, I'm guilty of that sometimes.
-
When using the default bushes it is necessary to cretae a seperate TG group for each individual bus state (small/Large etc) as shown in the below image this will allow the LOD change to work so helping perfomance

The image belows a hedge created using all four decoBush states with the Spline placement script set up as follows
Set Object Distance -- 2
Random 'Y' Rotation -- Selected
Random Order Selected

Note: When using the Random Order you may get gaps where a small hedge (which is less than 2m wide) is placed next to another small hedge.
-
Here's an example of using the default bushes in varying sizes/rotation/random object placement, placed with the spline placement script, experiment with the placement script settings to get the result you want.

-
Glad you finally got it sorted, ground texture wise it looks like you have inadvertently added lime to the terrain detail ground texture, make sure you only have the Set Foliage Layer and Ground Type selected and all the the other settings blank.
Hedges they were the default hedges, if you want alternative hedges then have a look at other maps FS22_Maypole Farm is one to look at.
You could ceate your own hedge simply by importing the decoBush i3d from Farming Simulator 2022--data-- foliage - decoBush and mix and match the hedge sizes/types in the Objects To Place TG with a Set Object distance, couls also add a pagodsa dogwood tree into the mix.
-
I don't use steam so not sure on the filepath but looking at your log it appears that the script has not found the BARLEY foliage either but with no error shown for BARLEY
The entry for BARLEY should show the following
BARLEY
Foliage State ; 0 , Remove , 1. invisible , 2. green small , 3. green small 2 , 4. green middle , 5. green big , 6. green big 2 , 7. harvest ready , 8. dead , 9. harvested ,which seems to point to a filepath problem so check the filepath to the data/foliage folder
The foliage in the Set Foliage Layer dropdown is taken directly from the i3d file so does all the default foliage appear in the dropdown ?
Having done a quick google search for the correct path when using steam I found this topic
https://gdn.giants-software.com/thread.php?categoryId=4&threadId=7351
and in the last post it shows the steam path as
"C:\Program Files (86)\Steam\steamapps\Farming Simulator 22\common\"
A quick way to double check that this is correct is in GE --File --Preferences and check the Game Installation --Installation Path
this entry then can be copy/pasted to the gInst variable in the script replacing the existing one, not forgetting the quotes.
-
I have updated the main tutorial to include the Text only version so all zip files can be downloaded from there.
-
Quote
the combine doesn't even cut the crop as soon as I drive into the crop which the field info says it's mine, the header just stops rotating and I loose control of the machine it just drives off
The scripts have nothing to do with the Combine driving problems your description points to a problem with your input bindings or a mod conflict.
The errors shown in your image are created by incorrect field painting/saving.
Suggest you redo the field from scratch
To help you with this I have created a TEXT ONLY VERSION in the .docx format (Word) of the main tutorial which is available at the end of the main tutorial.
Carefully follow the instructions do not try to shortcut any section any problems check the relevant section in the main tutorial for more in depth descriptions. -
No, you have to delete the main Field_Creation_Transform when finished doing all your fields remembering to put the new fields in the fieldsNew transform into the gameplay - fields transform group
I find it easier to do all the fields/farmlands before deleting the Field_Creation_Transform that way I can always go back and change a layout.
In the case of farmlands if you are modifying/changing any field you will have to delete the field entry in the farmlands.xml. The warning of an existing field is shown in the console this is done to prevent accidental deletion
-
Sorry I should have been clearer, the new mods folder should only contain the map you are working on, yes to use your original mods (mods_1 ) just rename both folders to suit ir mods_1 to mods mods to mods_2 or whatever name you choose.
Only the field TG (field01,02,03 etc) goes into the fields transform group in the Gameplay folder, what I normally do if starting fields from scratch is to delete all the fields (field01,02,03 etc) in the gameplay fields transform group leaving just the fields root TG then as I create the new field dimensions copy/paste the field (01,02,03 etc) into the gameplay fields transform group .
The farmlands script only creates the farmland area and adds the correct entry in the farmland(s) xml. See the tutorial for more info regarding painting terrai/foliage using this set of farmland/field dimensions
-
Quote
I tried to harvest the barley in my field it cut ok and I can get chopped straw out of the back of the harvester, but when setting the harvester to enable swath I get nothing
I have tried ploughing the field with a worker and that seems to work ok and the worker finds the edge of the fieldA quick review of your previous posts (shown above) indicates that the scripts are working correctly and the problems you are having with swathing and cutting grass could be a mod conflict or incorrect foliage layer/type used.
Also it is wise to turn off the autosave function in the Game Settings (each time you load the map) and rename your mods folder to mods_1 and create a new empty mods folder when testing any map.
-
I have just tested both grass cutting and straw/chopped on my test map and everything seems to be working correctly and yes comma key on the keyboard if you haven't got it assigned properly to your PS5 controller
One other thing springs to mind after doing any changes in GE a new game must be started otherwise foliage etc will revert to the save game profile.

-
1. Regarding Straw Swathe, check you are using the comma key on the keyboard to change output.
2. Grass how are you planting/creating the grass, if via the script then ensure you are selecting the correct type of grass and not any of the decorative versions.
grass field missions and field missions only apply to contracts
Also you have to own the field to be able to cut anything, ownership can be set in the script by selecting Default Farm Property to 'True' or by using the EasyDevControl mod


Updated Spline, CSV, Height, Paint, Place, Scripts
in Mapping
Posted
Which particular script and what version of Giants Editor are you using as some scripts do not currently work in GE 10 (scripts being updated at the moment).