


WrinkleysRule
-
Posts
419 -
Joined
-
Last visited
-
Days Won
94
Content Type
Profiles
Gallery
Downloads
Events
Forums
Articles
Posts posted by WrinkleysRule
-
-
I take it you have created and are using a Mod Map of Zielonka, changing the Base game map is not advisable also any changes you make will be overwritten by future patches.
-
Have you tried plowing to join the fields ???
-
The script has been updated for FS25 (further .obj update forthcoming) but if you scroll down to the bottom of the tutorial you will see that the earlier version is still availavble.
-
Even if you could scale a spline I don't see how it would help in your case because scaling would affect the whole spline so you will still have the different distances between them that you already have albeit larger or smaller.
As I see it your options are , adjust them manually or try using the Create Duplicate Offset Splines script (it has been updated for FS25) which would mean deleting some of the splines you have already created, looking at your image this option would only affect one spline anyway.
-
 1
1
-
-
That is because you cannot scale a spline you can only translate/rotate a spline, bear in mind if the spline is rotated for any reason you have to Freeze transform the rotation before using it in any script.
Also I can't think of any reason to scale a spline so I would be intrigued to know why you would want to.
-
Spline's may be a pain but you will still have to use them if you want to easily flatten the terrain for roads or create traffic/pedestrian/AI/Railway routes
Given the way roads are now created in FS 25, for example open a blank map in GE, create a plane adjust the height so it is above the terrain (approx 5m) add a texture to the plane and in the shapes tab select Terrain Decal the texture will be applied to the terrain contours.
It may be possible to use this method to paint the terrain but until details/lua of how its done are released/ worked out the only way I can think of doing it would be to create parallelograms of the road meshes which would not be ideal.
-
Ok I will have a look though I think it will be awkward given the size/shape and complexity of some road neshes.
You do realise you can use any spline to paint the terrain including traffic/AI/pedestrian splines, even the Ship Mover ones
-
I think I understand now you want to select a mesh object, like a road and use the road mesh size to paint the terrain underneath a corresponding length/width.
Basically using the road mesh as a brush.
Don't know if that can be easily done but will have a think and see what can/can't be done.
-
Not to sure what you mean by 'paint anything under my roads as an object' as you could use the the same spline for the road and to paint/place objects under it.
Bear in mind objects cannot be placed under the terrain with the scripts but can be placed level (or close to) with it if the objects point of origin is moved closer to the top of it.
-
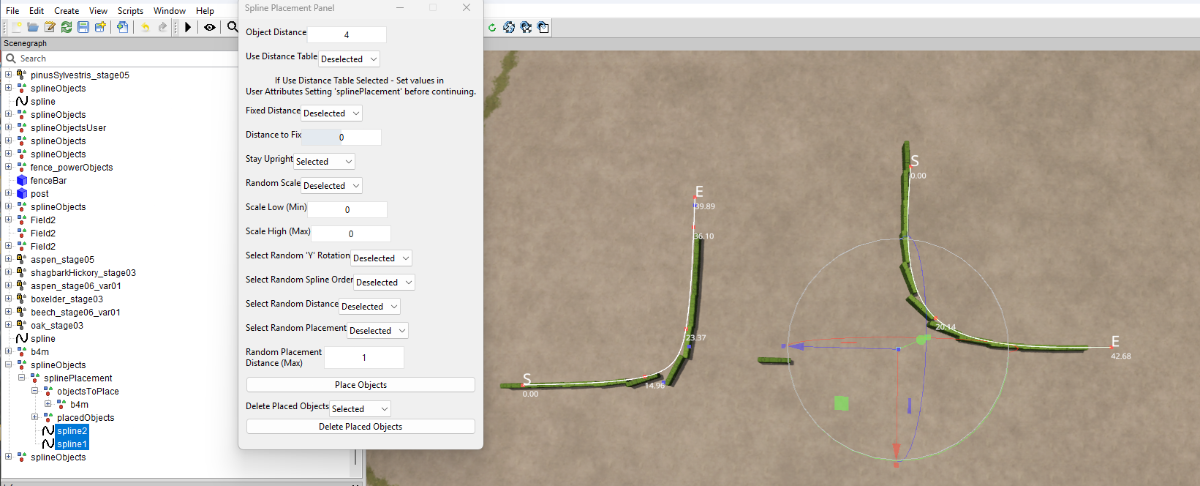
I hope I have now corrected the splinePlacementPanelCombined_25 script.
Changes to the Panel Settings
Stay Upright is now Deselected by default so any objects placed will now follow the terrain contour,
Selected they will remain upright regardless of the terrain contour.
Random Scale adjusted as mentioned in previous post
Random Placement random values adjusted to give a better placement
Known problem, when Fixed distance set value could cause bunching of objects dependending on Object Distance and the curve of the spline.
Any other problems found please notify me by PM or forum post.
-
Ok I changed the settings to get a more random scale but I will now revert to the previous settings in the next update, which will be after I sort this rotation problem.
In the meantime if you want to change the settings in GE script editor line 226 has the random scale section
Replace -- sx = scaleLow + math.random() * scaleHigh
with
local scale = scaleHigh - scaleLow
sx = math.random()*scale+scaleLow-
1
-
-
Sorry but it seems the problem is still there so disregard the following explanation
Ok, I have found an error in part of the code which was affecting the spline position/direction now seems to be working
So have updated the scripts zip with the updated splinePlacementPanelCombined script
In the image spline1 was added to the splinePlacement for clarity,
NOTE: when placing long hedges it is advisable to move the point of origin to the centre of the hedge mesh this will give a better alignment on corners.

Plese inform me ASAP either by PM or forum post of any problems that occur with the scripts so I can rectify them quickly.
-
@Dickieboy Then why haven't you notified me of the problem ?????
-
Scripts now updated and available here
-
 1
1
-
-
Apologise profusely, I have found an error in the script and will update the splinePlacementPanelCombined_25 script later today.
Problem was caused by the Random Scale settings some trees were given a scale of '0' with Scale Low (Min) set below 1 so were placed but invisible.
Script will be updated later as I have an update to do to the Fence Power Placement script also.
-
1
-
-
Post deleted Incorrect assumption
-
With the missing tree (aspen_stage05) selected in the scenegraph select 'F' on the keyboard, this will take you to the location of the tree on the map and let me know what happens
-
Move the terrain decal below the map and see if the trees are on the terrain and show the Attributes panel for one of the missing trees
Also the spline Placement panel with the settings you are using
-
That looks to me like you are trying to place trees on a border mesh which won't work the spline script will only place trees on the map terrain
-
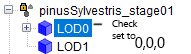
Are the trees point of origin/translation set correctly i.e. X = 0, Y = 0 ,Z= 0
Check that the LOD transform Group of the tree is not at a different translation to the parent Transform Group e.g pinusSylvestris_stage01 is the parent TG
-
Not necessarily, it would depend on what was kept inside the fence and whether those thicker bars shown in your image ( I presume the other bars are just rebar slotted into the upright ) were welded to the post,
Supported corner posts are generally used where the lateral pull of the wire/mesh could pull the post over in either direction once tensioned.
-
Once the fence has been created you could replace the corner post with a normal tripod type (easily created in GE ) to make it look more authentic eg

-
Quote
The rotation issue if the spline heads South vs if it heads North has been around for a while. It's something to do with euler rotations I think, but I never got round to figuring it out and fixing it.
Note: To avoid any confusion this only applies to using a spline in Spline Street Constructer and not when using any of the FS 25 scripts
-
I realise it must be hard to keep on top of all the spam/bots to keep the site clear and occasional problems will probably still occur.
It was a bit of a shock but thank you for all your work as I know you have have had some seroius medical episodes but once again thank you very much for your efforts in running this site. 🙂😊😊👍👍👍
-
1
-
Idea for Painting on the ground...
in Mapping
Posted
When I can find out a bit more information on its use, as usual there is no information on what it can be used for.
You can adjust it by moving the various points but if you try to use the inbuilt Paint Terrain by spline script (Scripts - Shared Scripts- Map -Terrain) you get a 'Error: No Splines Selected'