


bdbssb
-
Posts
469 -
Joined
-
Last visited
-
Days Won
90
Content Type
Profiles
Gallery
Downloads
Events
Forums
Articles
Posts posted by bdbssb
-
-
If it has a capacity then density/mass can be disabled too. I would have to look at the xml. Do you have a link?
-
And welcome to the site. Thank you for posting. We need to use the forum more.
-
When you say turn better. You mean it’s just pulling hard? The down force can be lowered. That would be easier than adding a 3-point.
-
Ty for posting and ty for the shoutout. I wish more people would begin to use this discussion board. I’ve said it many times. Discord is very convenient however good discussions get buried there. It’s a minefield of valuable info that can be hard to track down.
-
I was helping someone with a bale fork and the dynamic mount had to be added to the move tools. Before adding the forks would register a bale however it would simply pull through the bale instead of lifting it. Had to add
dynamicMount=“true”
-
So I have had a couple of people working with vehicle type and specialization and I wanted to pass on how the game engine handles these attributes. So every vehicle has a type name at the top of the xml. Example below.
<?xml version="1.0" encoding="utf-8" standalone="no" ?>
<vehicle type="carFillable">
<annotation>Copyright (C) GIANTS Software GmbH, All Rights Reserved.</annotation>The "carFillable" tells the game engine to look for specific attributes in the xml. I do not know the specific name however this is how I refer to this process. I will attach a file called FS19_vehicleTypes.xml that will come in helpful and what I will be referring to. So when I search "carFillable" in the file we will see this
<type name="carFillable" parent="baseDrivable">
<specialization name="fillVolume" />
<specialization name="dischargeable" />
<specialization name="trailer" />
<specialization name="tensionBelts" />
<specialization name="foldable" />
</type>The xml is telling the game load vehicle type "carFillable" which has the specializations listed below of fillVolume, dischargeable, trailer, tensionBelts, foldable. But then you see parent with the name "baseDrivable" so we need to search the xml for "baseDrivable", be sure to go to the top of the document to find the actual type "baseDrivable" not a listing of a parent like above.
You want to see this
<type name="baseDrivable" parent="base">
<specialization name="ikChains" />
<specialization name="wheels" />
<specialization name="crawlers" />
<specialization name="slopeCompensation" />
<specialization name="speedRotatingParts" />
<specialization name="enterable" />
<specialization name="fillUnit" />
<specialization name="motorized" />
<specialization name="drivable" />
<specialization name="aiVehicle" />
<specialization name="aiImplement" />
<specialization name="articulatedAxis" />
<specialization name="lights" />
<specialization name="attacherJoints" />
<specialization name="powerTakeOffs" />
<specialization name="suspensions" />
<specialization name="connectionHoses" />
<specialization name="honk" />
<specialization name="wipers" />
<specialization name="frontloaderAttacher" />
<specialization name="bunkerSiloCompacter" />
</type>As you can see there are many more specializations in this vehicle type but we also have a parent of "base" so lets search for base.
<type name="base" className="Vehicle" filename="dataS/scripts/vehicles/Vehicle.lua" >
<specialization name="baseMaterial" />
<specialization name="tipOccluder" />
<specialization name="foliageBending" />
<specialization name="washable" />
<specialization name="wearable" />
<specialization name="dynamicallyLoadedParts" />
<specialization name="animatedVehicle" />
<specialization name="dashboard" />
<specialization name="cylindered" />
<specialization name="mountable" />
</type>As you can see there is no parent listed so there is no need to reference any further. Now if we simply look at all the referenced specializations we have this list.
<specialization name="baseMaterial" />
<specialization name="tipOccluder" />
<specialization name="foliageBending" />
<specialization name="washable" />
<specialization name="wearable" />
<specialization name="dynamicallyLoadedParts" />
<specialization name="animatedVehicle" />
<specialization name="dashboard" />
<specialization name="cylindered" />
<specialization name="mountable" /><specialization name="ikChains" />
<specialization name="wheels" />
<specialization name="crawlers" />
<specialization name="slopeCompensation" />
<specialization name="speedRotatingParts" />
<specialization name="enterable" />
<specialization name="fillUnit" />
<specialization name="motorized" />
<specialization name="drivable" />
<specialization name="aiVehicle" />
<specialization name="aiImplement" />
<specialization name="articulatedAxis" />
<specialization name="lights" />
<specialization name="attacherJoints" />
<specialization name="powerTakeOffs" />
<specialization name="suspensions" />
<specialization name="connectionHoses" />
<specialization name="honk" />
<specialization name="wipers" />
<specialization name="frontloaderAttacher" />
<specialization name="bunkerSiloCompacter" /><specialization name="fillVolume" />
<specialization name="dischargeable" />
<specialization name="trailer" />
<specialization name="tensionBelts" />
<specialization name="foldable" />This seems like a lot to take in but honestly just take the time to search and follow the names.
Now if you have a vehicle you are building and you cannot find a default vehicle with the specializations you want then you need to add a custom vehicle type in your modDesc. You would add these lines in your modDesc file. I use a customized vehicle type in my Factory pack but below is an example of the lines you would need to add.
<vehicleTypes>
<type name="fuelTrailer2" parent="baseFillable" filename="$dataS/scripts/vehicles/Vehicle.lua">
<specialization name="fillTriggerVehicle" />
<specialization name="dischargeable" />
<specialization name="waterTrailer" />
</type>
</vehicleTypes>It is important that you use a type name that is not used as a default type or the game will simply load the default vehicle type. The easiest way to do this is to search for your new name in the FS19_vehicleTypes.xml and be sure it is not found.
Next you would put "fuelTrailer2" in the vehicle's xml type name and it would be adding the 3 specialization's listed along with every specialization loaded from parent "baseFillable" as I showed how to do above.
Hope this helped and please feel free to respond with any questions or suggestions.
-
I added this in to tutorials.
-
If you have ever added a wheel to a part that folds then you have probably ran in to the issue of the wheel moving but the wheel collision not? If you figured it out great, if not here ya go.
The issue is the wheel has to be called out in the moving tool area. I am going to copy some lines in from a plow that thumper was having issues with. I helped him via a dm in discord.
So the key here is to know the part that is moving in the animation and the wheels that are in that part. If you are using cylinder parts or not it will matter as well. In the example the first 2 parts have cylinder parts (parts that move with a reference). The last part is just a moving part with the wheels inside it. It matters because the lines are closed off differently. As a guide I used the krone forager to figure out how move the collisions. They are invisible wheels. The forage heads will pivot, they don't lock like a harvester header.
So here is the animation lines I looked at.
<animations>
<animation name="folding"><part node="leftWing" endTime="15" startTime="0" startRot="0 0 0" endRot="0 0 114.4"/>
<part node="rightWing" endTime="15" startTime="0" startRot="0 0 0" endRot="0 0 -114.4"/>
<part node="leftArm" endTime="15" startTime="0" startRot="0 0 0" endRot="0 0 -114.4"/>
<part node="rightArm" endTime="15" startTime="0" startRot="0 0 0" endRot="0 0 114.4"/><part node="leftSupport" endTime="15" startTime="0" startRot="0 0 0" endRot="0 0 114.4"/>
<part node="rightSupport" endTime="15" startTime="0" startRot="0 0 0" endRot="0 0 -114.4"/>
</animation>
<animation name="lowerAnimation">
<part node="bottomSupport" startTime="0" endTime="2.5" endRot="-20 0 0" startRot="0 0 0"/>
<part node="topSupport" startTime="0" endTime="2.5" endRot="-20 0 0" startRot="0 0 0"/>
<part node="swivel" startTime="0" endTime="2.5" endRot="20 0 0" startRot="0 0 0"/>
<part node="assistCylinder" startTime="0" endTime="2.5" endRot="-16.5 0 0" startRot="0 0 0"/>
<part node="assistRam" startTime="0" endTime="2.5" endTrans="0 0 -0.978" startTrans="0 0 -0.894"/>
</animation>
</animations>The leftWing and rightWing are where the first and second set of wheels are.
The second set are in the swivel.
<cylindered>
<movingTools>
<movingTool node="leftWing" playSound="true" wheelIndices="1">
<dependentPart node="leftCylinder"/>
</movingTool>
<movingTool node="rightWing" playSound="true" wheelIndices="2">
<dependentPart node="rightCylinder"/>
</movingTool>
<movingTool node="swivel" wheelIndices="7 8 9 10"/>
</movingTools>
<movingParts>
<movingPart node="leftCylinder" referencePoint="leftJointHyd" referenceFrame="0" isActiveDirty="true">
<translatingPart node="leftRam"/>
</movingPart>
<movingPart node="rightCylinder" referencePoint="rightJointHyd" referenceFrame="0" isActiveDirty="true">
<translatingPart node="rightRam"/>
</movingPart>
</movingParts>
<sounds>
<hydraulic template="DEFAULT_HYDRAULIC_SOUND"/>
</sounds>
</cylindered>As you can see the leftWing and rightWing have cylinder parts, the swivel does not. That is why they are closed off differently. The swivel line would not normally be there but it had to be added to call out the wheel indices. As you can see all that had to be done was to add the wheelIndices comand in so that the game engine knows that there are wheels inside the moving part. When indexing indices you start with 1. So simply wheel 1 is in the leftWing, wheel 2 is in the rightWing, and wheels 7 8 9 10 are in the swivel. I know this would probably be better explained in a video however I wanted to add it here quick to help those that may have had an issue.
-
Did you download all the suggested additional mods?
-
Thank you for the explaination.
-
Good question
-
Have you studied this?
-
 1
1
-
-
I’ll check around. I haven’t used geese.
-
Even though I’m not familiar I may be able to look at the lines you edited and see if I see an issue. Either copy the lines here or share the mod in a private message and I can always take a look. That and looking at your log would be a start as well.
-
I have not used the configuration script itself I have only added config options used in default equipment. I will point someone here that is familiar with it.
Sorry for the delay. I keep urging individuals to use this forum however we are all stuck in our comfort zone of using discord. -
Fermenter Pack Additional Fill Type
This is simply my fermenter pack (please click link for full details if you are not familiar) edited to take alfalfa and clover. Per request I also upped the capacity to 10Mil instead of 5 Mil.
FYI if you put this palceable pack on a map that doesn't have alfalfa or clover you will simply receive a warning in the gc panel. I don't believe it will cause any other issues, just wanted users to beware. This was specifically made per request by Amata316 to use on Landownuda.
Just updated this placeable so that the Global Company warnings are fixed. I forgot when I changed the folder name it would need the language file updated. Thanks to Rebecca for letting me know about the issue.
-
Submitter
-
Submitted01/11/2021
-
Category
-
CREDITSBDBSSB, Global Company
-
-
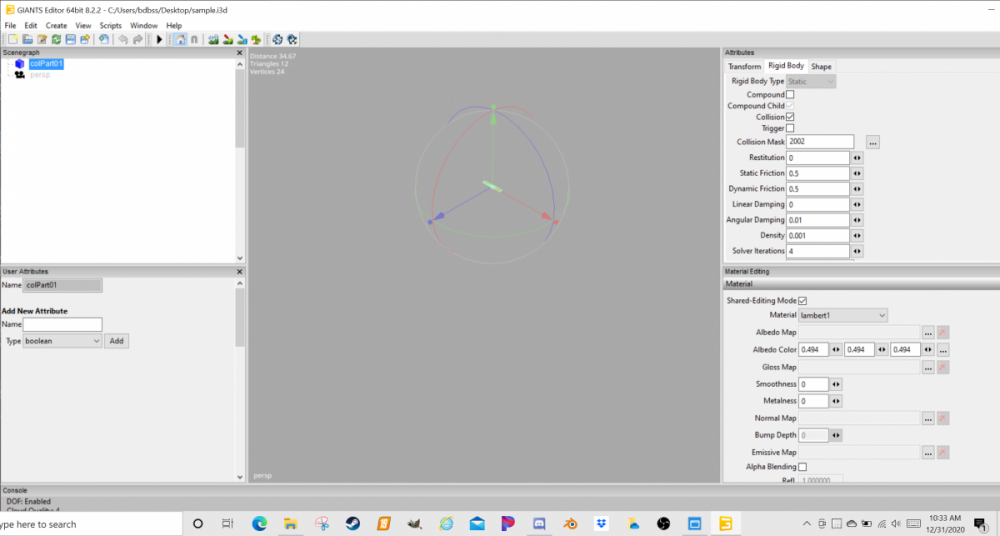
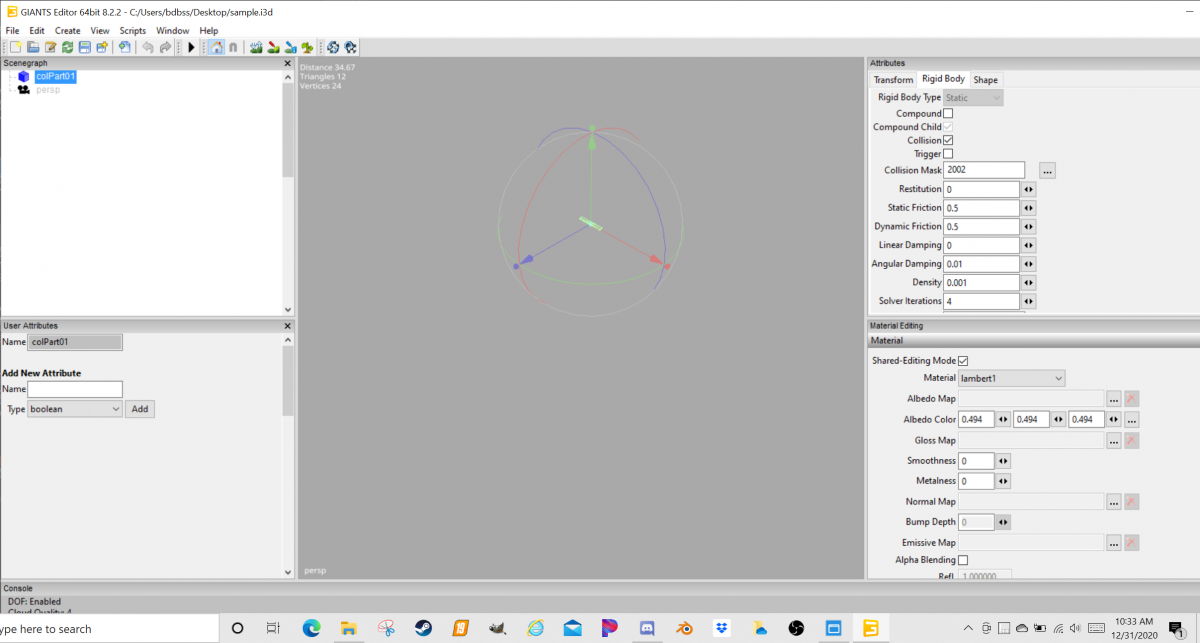
This has been asked multiple times in discord so I thought I would add the subject here. To add a collision inside a vehicle the parent component in the rigid settings compound has to be checked. Also in the child collision part compound child has to be activated. Like shywizard has commented these settings can be applied while exporting a model in the new exporter for blender 2.9 or you can add the following example to the par by editing the i3d via notepad. Refer to the compoundChild part below. After saving the i3d in notepad and opening it back up in ge the grayed out box will be check like in the image below.
```xml
<Scene>
<Shape shapeId="1" name="colPart01" translation="0.000757065 1.00552 -1.00853" compoundChild="true" collisionMask="8194" density="0.001" nodeId="166" materialIds="4" castsShadows="true" receiveShadows="true" nonRenderable="true"/>
</Scene>
```
-
Huge thanks to fscommando for getting the site setup to add this video.
-
1
-
-
Shywizard did this awesome video, I wanted to be sure to share it here so he doesn't have to use his personal file space.
-
1
-
 2
2
-
-
Correct @Poorboy good find. For those of you who aren’t aware if you make a new map from a previous one it will usually have an existing tip collision mask. You need to paint a new one because the original map will have all the road areas and buildings painted so that material can’t be dumped on those areas. What will happen is when you mow grass or even for example straw windrowed will not appear in those areas but then mound up as soon as you hit a spot that doesn’t have the painted area. You have to remove all tip collision area and re paint then run the script.
-
1
-
-
Talked on discord. Anyone following it was a corrupt file.
-
Yeah I’ve never checked to see if you can open it somehow with notepad but once the map is loaded scroll all the way through the console to double check for errors or warnings. If there is a missing shader it can cause that.
-
Are there any errors or warnings listed in the console in ge?
-
That is new to me. I’ll see if I can find an answer.
Ikonic Fieldliner
in Equipment
Posted
Ok I’ll try to take a look. The turning radius can be changed as well I believe.